I'm so excited to share with you part of
Jior Couture's Fall collection called SWL! It's a 12 piece collection with two sets, each with six bottles. One set is called the SWL: Bitter and the other, the SWL: Sweet. Today, I have the 6 colours from the SWL:Sweet. Here's a group shot of the one's I got to try out!
 |
| (From left to right: Resurrection, Reformation, Redemption, Hope, Forgiveness and Awakened) |
Before we get started with the pictures, I want to mention that the formula on these were amazing! I did not have problems with any of them. They went on smoothly, leveled out nicely and also dried pretty quickly. I received the polishes in the mini size, which for Jior, are 9ml. They are a nice in between of the 5ml bottles some makers use and the 15ml full size bottles. They were easy to hold and the handles are long which allowed for the same controlled application you get from full size brushes.
This post is picture heavy but trust me, it's worth it!
To start, this is Awakened. It's a multichrome so at different angles you can see some tones of purple-red, orange, copper and gold. It has so much going on I think it may even have some greens in it! In my photos, I used 2 coats.
In the direct sunlight you can mainly see the purple-red colour but in the shade and at an angle, the multichrome begins to show! The macro shot is my favourite because it reminds me of the sun setting!
 | | | |
| (Direct sunlight) |
|
|
|
|
 |
| (Shade) |
 |
| (Overcast) |
 |
| (Shade) |
Next up is Forgiveness. It's an orange leaning light brown with a holographic finish. It was opaque in 1 coat (Amazing!) but I used 2 just to be safe. To be honest, I thought I would really dislike this colour on my skin tone but it actually ended up being one of my favourites despite it being a colour I don't choose very often!
Something to note, the holo in my pictures is a little dulled from my top coat (darn you Seche Vite!), it's much more holo without the top coat and in real life.
 |
| (Direct sunlight) |
 |
| (Shade) |
 |
| (Direct sunlight) |
Hope is a multichrome and microglitter polish. It's base is a sheer pearly colour with pink, purple and blue shimmer along with a fine holo microglitter. It's meant to be a topper but can of course be worn alone. My nails are super yellow so I am sparing you the pictures of it worn alone - haha! It's shimmer shines through best on dark colours but unfortunately during my move I misplaced my blacks and didn't get to try it over a black creme. Instead, I used 3 coats over Redemption and then tried 3 coats over white to capture the details in the macro.
 |
| (Direct sunlight) |
 |
| (Shade) |
Here is Redemption - my favourite of the bunch! It has a duochrome/ shimmer finish - the base is a sheer navy blue with super fine blue to green flakes. Shown below is 3 coats to reach opacity but the polish dries very fast because of how much glitter flakies are packed into the jelly base.
This colour in direct sunlight looked like a blue foil colour, but in the shade it is just the prettiest shifty colour ever! I wanted to keep it on my nails forever .. but there were more polishes waiting to be worn!
 |
| (Direct sunlight) |
 |
| (Shade) |
 |
| (Shade) |
 |
| (Shade) |
If you like the jelly and flake combination Reformation is for you! The base is a jelly royal blue colour scattered with irridescent flakes throughout. I managed to get it semi-opaque in 5 coats but if you're not into waiting that long and VNL bothers you, I also tried 3 coats over white. Over white, the blue turned into a periwinkle kind of colour - such a versatile polish!
 |
| (Direct sunlight) |
 |
| (Overcast) |
 |
| (Direct sunlight) |
 |
| (Direct sunlight) |
And the last polish is Ressurection! It is a holographic-multichrome combination finish. The formula was a little on the thin side but built up nicely and was opaque in 3 smooth coats. The colours in this one ranged from a dark purple to green and to gold/yellow. This one is just so gorgeous - every time I glanced at my nails I'd get distracted and would wiggle my fingers around to catch the light at all angles!
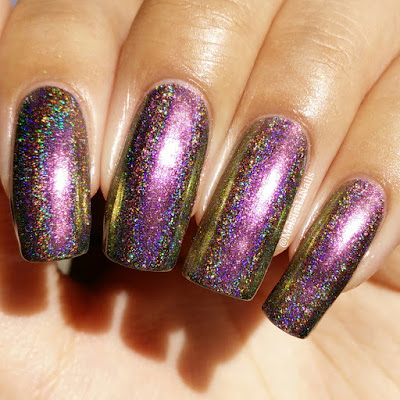 |
| (Direct sunlight) |
 |
| (Overcast) |
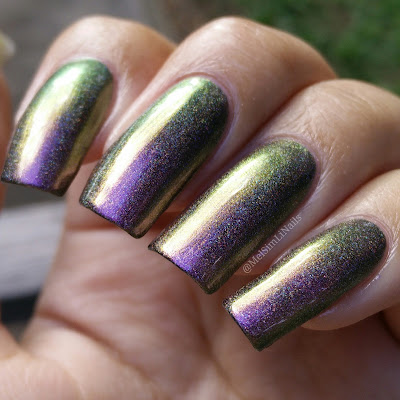 |
| (Shade) |
 |
| (Direct sunlight) |
Phew - you made it to the end! All photos above were taken in natural lighting and all swatches were topped with Seche Vite. Don't forget to check out Jior Couture's other bloggers to see the other 6 colours! The SWL collection will be available to purchase in their
shop on September 15th.
Which one was your favourite? Let me know below!
Thanks for reading!
*Press Sample - the product was provided in exchange for an honest review.
Read more ...


